 Official Government Website
An example of a Recruiter Card.

What a Recruiter Card looks like when editing the page.
The easiest way to make one of these is to copy one from somewhere, paste it where you want it and then change the data inside.
Editing a Recruiter Card
The hardest parts of this process are finding a picture with decent size (so it won’t be fuzzy) and cropping the photo (see here for instructions on cropping the photo)
There are 4 pieces of information that you will need to change in a recruiter card. Each piece of information should be enclosed within quotes.
1. Path to the picture

Get the path to the new picture from the Media Library (how to get the picture path)
The path should look something like this:
11/2019/08/Branch_Holly-4-1.jpg
Once you have copied the path to your clipboard (<CTRL>C), 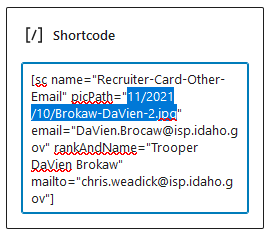
highlight the picPath as shown above (between the quotes) and paste the new path (<CTRL>V).
The rest of these are easier and are just a matter of typing.
2. Email Address to Display
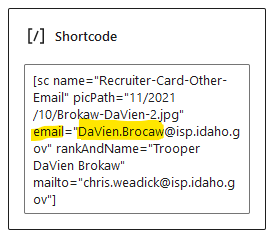
This is the email address text that shows under the name. (note: It is the text shown not the actual email address that it is sent to. That is #4 below. In District 6 these are not the same. Usually #2 and #4 are the same.) Type in the name for the email address.
3. Rank and Name
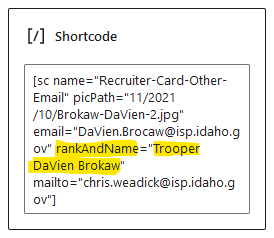
Type in their title/rank and name as you would like them to be displayed under the picture.
4. Mailto – Where the email will be sent when clicking on the name/display email

I’ve purposely shown a card from D6 as they currently have the email from the pictured recruiter shown but when you click on it it actually goes to another trooper. Usually both of these email addresses will be the same but in this instance they are different. Type in the name for the address where you would like this email to actually go.
Once these have been completed press ![]() and check to verify that everything is working as intended.
and check to verify that everything is working as intended.


